
Mornin Ladies !
How have you been ?
I've been good. Work is great but can also get very stressful. We had Vogue.in's first anniversary party on Thursday and it was a blast. So not stuck-uppy. Everybody loosened up and got on the floor. Boss, big boss - everybody.
And now its that time after a party when the pictures come back and you you find all those embarrassing drunk pics. Good Lord. Lets not go there.
Here is a pic of mine from the party. I know, its first time sharing a full face pic. Cant say I am not nervous but Mumbai making me slightly more brave.
poof...
Makeup Used:
1. Smashbox Photo finish Primer
2. Revlon Photo ready concealer
3. Milani Brow Kit
4. Sleek Palette - Dirty bronze color on lid.
5. Lancome Artliner - black
6. Carmindy for Sally Hansen Blush - Cherub
7. Three Custom Colors Lipstick - Majorca
8. Julie Hewett Lipstick - Belle Noir
Lessons learned:
1. If you are having a fairly good skin day - skip the foundation.
2. If its a dim lit setting, go for a bright lipstick . It pops well in pictures especially when you are wearing something as boring as black.
3. Revlon Photoready concealer is the bomb. It really is perfect for pictures.
4. Blotting sheets are a must in your bag.
5. A blow dry before a big party is totally worth it.
6. So is a pedicure / manicure. I went with a soft almost wedding-y color - O.P.I - Kiss on the cheek.
7. Go ahead , have fun even if its a work thing. No body is going to remember a thing the next day. Not even you will.
Umm...If you like this. I'll have up more makeup break downs now on.
Love,
Indian Girl


When I started out with wearing eye makeup there was one tiny little thing I always did - highlight the inner corner of my eye. I used to use NYC eyeliner pencil duo which had a gold shade on one end and black on the other end. A hint of that gold on my inner corner always got me compliments. And for someone starting out in makeup that gave me a lot of confidence and told me I wasn't doing it all wrong !
This is a look that progresses in five steps. We start out with the gold on the inner corner and work our way from there ! Each stage is / was a complete look on its own for me and you will love how easy it really is !
Given my tan skin (NC40) I love using gold. But if you have ...
Very fair / light skin tone try - champagne/ silver/ pearly white / pale gold
and
Medium / Dark Skin Tone try - Gold / Bronze / Honey Gold.
These are easy choices AKA blanket statement. Use anything that makes your eyes pop and makes you feel better.
PRODUCTS USED :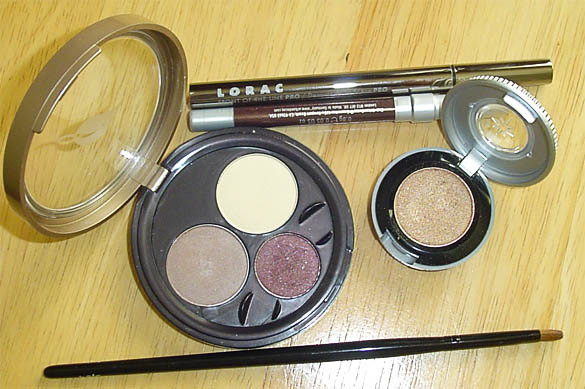
STEP BY STEP TUTORIAL
STAGE 1 : A clean set of brows, some mascara and gold on the inner corner.
Here I used a gold shadow ( Urban Decay - Half Baked ) and a small flat shadow brush to apply it. A gold pencil like the one from NYC will make this all the more easier.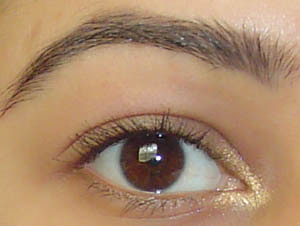
STAGE 2 : A little liquid eyeliner along the upper lash line.
I used brown LORAC eyeliner. But black will look just as great. A favorite drugstore liquid eyeliner of mine is the one from Prestige Cosmetics.
STAGE 3 : Run a pencil eyeliner along the lower lash line.
I used brown ( Urban Decay - Bourbon) just to keep it uniform.
STAGE 4 : Use a plum brown shadow along the lower lash line softly lining it. I generally start from the outer corner moving inwards, so the shade fades as it moves towards the inner corner.
I've used the plum brown shade form Sally Hansen Natural Beauty Shadow Trio - The Stone Eye Palette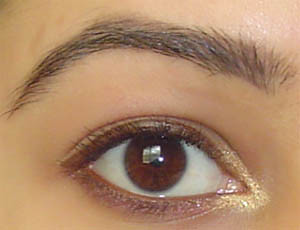
STAGE 5 : Apply the same shadow along the upper lash line.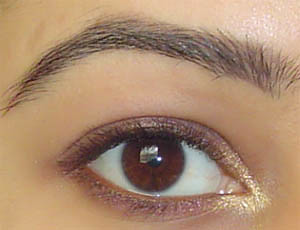
That's it there you have it - a perfectly good beginners look in five easy steps. But the best part - you can stop at any stage just add some mascara, do your brows and you are good to go !
Lemme know if these tidbits are helping you. Its fun sharing my personal journey through the world of beauty !
Love,
Indian Girl
Another video !
I still am a long way from doing a great job in videos. But am learning ! You'll see me go up and down depending on how straight I'm sitting. My mirror also kept falling off and I kept going away from the video frame in search of my mirror. You'll notice some quick shots - too quick. All noted and will slowly be improved on for next video.
Making a video is not easy man. Much respect to all those who do it so right !
This one is an Easy Brown Eye Makeup Look for beginners to play with !
No crease, no inner corner, outer corner complications. Its simple and straight forward. Takes all of four minutes to do !
Do me a favor and don't enlarge it to full screen - the quality reduced 100 times and its just weird seeing such a big eye.
Hope you guys enjoy the video !
Brushes :
Trish McEvoy Flat Eyeshadow Brush #21 - for laying the first brown eyeshadow from twilight palette
Fluffy pointed blending brush ( Smashbox Crease Brush #10) - for applying the second golden brown color from NIXIE
Smashbox Double Ended Smudger Brush #20 - for applying black eyeshadow as liner along upper and lower lash line.
CVS has a set of brushes called Essence of Beauty brushes - they are equally good & are budget friendly. I love them !
Love,
Indian Girl
Starting today I am working on a series of eye makeup posts for beginners. This series will mostly be a reflection of how I started out playing with eye makeup. They are simple eye looks to try out before going for a full on smokey eye.
I am hoping y'all will find it useful ! This and the next few others to come will be about playing with eyeliners.
There are several kinds of eyeliners in the market. There are gel eyeliners, creme eyeliners, liquid , pencil, powder eyeliners. For this look I prefer a liquid eyeliner. You can any others !
I used LORAC Front Of The Line Water Resistant Liquid Eyeliner in brown. It is now on sale for $10. Other liquid eyeliners I like are the ones from Prestige. L'Oreal, Revlon, Maybelline, NYC - everybody makes liquid eyeliners.
Brown is a great color to begin your eyeliner journey with. It is a little softer than black which might look too jarring if you're not used to seeing any makeup on your face !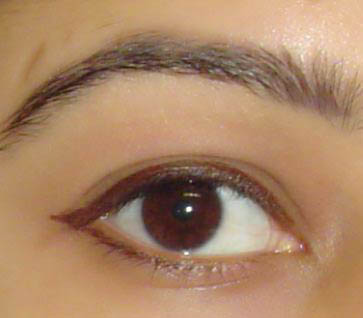 For this look
1. Start from the inner corner of your eye and line along the entire length of your upper lash line.
2. Start from outer corner of your eye and slowly draw a thin line half way along the lower lash line.
3. Start from the outer edge of lower lash line draw a small wing upwards and outwards - done.
Winging is always easy when you start form the lower lash line ad move upwards & outwards. And remember as you begin, keep the wing small to very small. Its always easier to elongate one. If its too long, use a Q tip dipped in water / makeup remove t wipe off the length.
Related Useful Posts
Eye Makeup Application Areas
Prestige Liquid Liner
How To Apply Liquid Eye Liner
Winged Eyeliner - How To ?
Love,
Indian Girl





 Posts


